

I decided since I have some color in our yard, I would get crafty with some flowers. Most of us know we usually dry flowers with books, etc.
Why not dry your flowers quickly in the microwave? All it takes it two bricks, blocks, something similar, a paper towel and a dish towel and of course flowers of your choice. Remember the old phone books? They were perfect for pressed flowers.

Most of us are lucky enough to have some flowers in our yard. I took a basket outside and started cutting some flowers.

Here's a basket of picked flowers.We have lavender, wisteria, rosemary, lilac, yellow daisies, cyclamen, leaves. etc.

I have laid them out as flat as possible on top of my paper towel. Then put this on the first brick. Lay a clean dish towel on top of the flowers. You could probably use tiles too. Remember every microwave is different, so you should check out the bricks and time.

Don't press down, the brick will do that. Then put the two bricks in the microwave for about 2 minutes. Carefully lift the dish towel to check to see if the flowers are dry. If not, carefully remove the dish towel and turn the flowers over and re-cover and put back in the microwave about two minutes. After that, Check in 30-60 second increments to see if they are dry. Keep doing this until your flowers are dry Microwaving the flowers will help to keep the colors.

You can most of the flowers retain their color. Now they are dried, you can create something pretty. Do you notice the colors before the microwave? Be absolutely careful when removing your bricks.

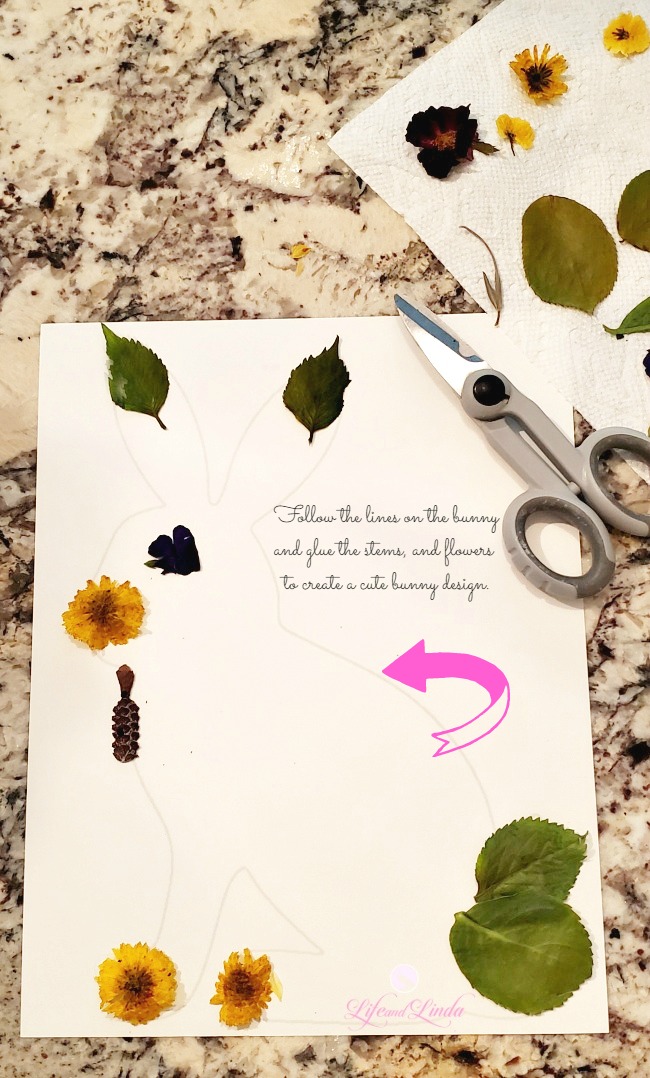
Print your bunny on cardstock. I used a hot glue gun to attach my flowers to the cardstock. Follow the lines of the bunny. You could also use glue you have on hand. Get creative! You can outline the bunny with stems first and then filled in.
I used pointed leaves for the bunny ears and a full leaf from a hydrangea for the tail.
Little by little adding your dried flowers to the bunny until it is all covered. Let set up and dry thoroughly and then you can add the bunny in a frame with glass.

Here's the Bunny printable I used. I think a butterfly would look fabulous! You can even purchase a frame from the dollar store. A handmade gift that is easy and so inexpensive to make.
Imagine the things you can make with dried flowers. Get creative and have fun
You could also just make a floral arrangement on cardstock for your walls.

I have several frames, so I chose one with a mat. The 8x10 bunny looks great behind glass in the frame.
*Tip - store your dried flowers in an airtight container in a cool spot. Dried flowers tend to fall apart when not properly stored. I believe adding them behind glass will keep them nicely.
Below is a yellow bird that flew into our french doors. It was stunned, so I picked it up and out it on a table. Many birds are not able to fly off after window collisions. If they are knocked out or stunned and on the ground they should be gently picked up and placed in a warm, dark, safe place for up to an hour or so.

After awhile, it flew away. Sweet little bird.

Keeping busy is wonderful and it also gives us time to do things we never thought we had time for.


Sign up with your email address to receive the latest updates straight in your inbox.

This is really cute and fun way to use flowers from your garden. Happy Friday and have a great weekend.,
ReplyDeletexoxo
Kris
So creative and pretty!
ReplyDeleteWhat a cute idea! What a fun way to save your flowers and create unique art!
ReplyDeleteI never knew that you could dry flowers in the microwave this way. When I was little my mom had flowers between wax paper in a bunch of thick books. Whenever you opened a big book thee was sure to be a flower in there between the pages.
ReplyDeleteYou are so creative..you will always love this♥And that bird♥
ReplyDeleteTake care..
Very cute craft!! You are very clever! Stay well!
ReplyDeleteLinda, I was waiting for this tutorial! I am AMAZED by the process, but not by your talent. You are so creative...Thanks for sharing!
ReplyDeleteOh Linda, this is such a wonderful project! I've always dried flowers for potpourri and small dried arrangements but I love this framed art work. The bunny is adorable! I'm so happy the sweet little yellow birdie was able to recover from his crash and fly away. What a lovely photo of him. Such a sweet post Linda. Have a nice weekend............
ReplyDeleteYour floral bunny is so pretty and thanks Linda for sharing this craft with us. The little bird is so cute and glad it was able to fly away. Enjoy the weekend.
ReplyDeleteHola Linda, he secado cientos y cientos de flores para luego hacer composiciones, pero nunca se me hubiera ocurrido hacerlo en e microondas, una idea fantástica, que gusto que ya puedas recoge flores de tu jardín, yo estoy encerrada en mi casa de Barcelona sin poder salir, no sabes las ganas que tengo de salir a pasear por el campo, probablemente más que otros años que pudiendo hacerlo no lo hacía. Tu conejito es una delicadeza. ¿Y ese pajarito?, ¡es precioso!, ¿es un Verderol?, pobrecito. Un abrazo muy fuerte y cuidaros
ReplyDeleteAwwww wo sorry you cannot even venture out to take a walk. How amazing you have been drying flowers for years. This method is quick. Do take care and be safe. Big Hugs Pilar.
DeleteI adore the photo of the little bird in your hand. I'm so glad you could rescue him. And what a smart way to dry flowers -- beats my little flower press! And so vibrant. I especially love the bunny. Well done.
ReplyDeleteSuch a wonderful idea Linda!! Your flower bunny is adorable!!
ReplyDeleteJenna
Wow, I didn't know drying flowers could be so quick! Thanks for sharing your technique, I'd love to try this--and what a beautiful picture you created with them!
ReplyDeletePamela ~ DIY Vibes
Linda, what a great idea. Just perfect for Easter time. What a sweet little bird. I have never seen one that bright around here. Do you know the specie? Stay safe and stay well..xxoJudy
ReplyDeleteHow pretty, so unique! Cute little bird, too! Thanks so much for linking up with me at #AThemedLinkup 15 for Crafts and DIY, open April 15 to 25. All entries shared on social media if share buttons installed. Won’t you check out my other link parties too?
ReplyDeleteLive new flowers can be improved in any structure, though dried flowers are somewhat more adaptable since they can be made into table courses of action, loots, occasion wreaths and incidental art thoughts. Dried Flowers
ReplyDeleteMoreover, dried decorative layouts cost substantially less to purchase instead of newly cut flowers. Dried Flowers
ReplyDelete